Rabu, 23 Juni 2010
This time I will try to provide information on how to assemble a computer, okay,, preparations should we prepare is
 STEP 1
I suggest you'd better to make assembling computers in private rooms and is free of dust. Ideally, it's in the air-conditioned room (air conditioning). Prepare a worktable that is wide enough to put all the equipment and supplies, and put a comfortable chair. Do not smoke, because of cigarette ash can contaminate and damage PC components, especially processors. Put your drinking water away from the desk. Use lighting that is also quite strong.
 |  |
To avoid static currents make sure electrical outlets in your home or use an earthed Antistatic wrist strap and rubber sandals. Anti-static bracelet is a bracelet wired one end attached to the PC casing. Do not stand with bare feet or step on something that conducts electricity, such as sheet vinyl or plastic sheets. O yes, wash your hands first and allow to dry. This is to avoid sweat and dirt on hands can cause rusting PC components
 OPENING CASING AND LOADING POWER SUPPLY
STEP 3
 OPENING CASING AND LOADING POWER SUPPLY
STEP 3
Prepare casings, open it and remove it from the box. Casing that we use here is a tower model with the side cover. Open the two covers side by removing the four bolts that are behind the casing. Store the first two cover addition in a safe place.
 STEP 4
Then Put swicthing power supply unit (PSU) adapter in the space provided. In the middle of tower and tower models, usually place at the top. Then glue it with four bolts. You can skip this step if you purchased the casing have included PSU in it.
 LOADING CPU AND MOTHERBOARD
STEP 5
Open up the box your motherboard, remove and place the motherboard on the table. But earlier, give the mats at the bottom of the motherboard with a cork which is available in the crib. Find the processor chip on the motherboard socket. The socket has a hole in accordance with the number of pins on the chip. In one corner there are two holes that are closed.
 STEP 6
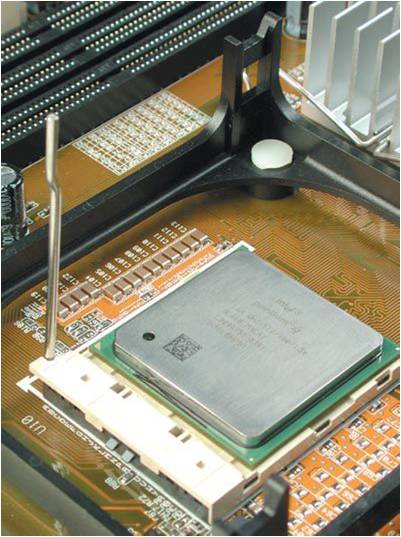
Remove the processor by way of a hook lever pressing and then pull it upwards. Position hooks should be completely perpendicular, so that the socket holes completely open. Take processor, hold it firmly on the side-fractions. Then position it on the processor socket, make sure the corner is marked with a triangle near the hook. Plug in the processor chip in the socket and make sure the pin stuck into it. Be careful, do not be bent or broken pins.
 STEP 7
After the chip entered correctly into the socket, lower the hook by way of pushing back down. Hook up completely locked so that the processor chip can not be separated. Chip is not locked can also cause errors when the computer starts
 STEP 8
Should give the heatsink and fan on the processor chip to heat the processor is not fast and durable. Apply a little thermal paste or pasta cooler on it, then attach the heatsink and fan on top. Lock the processor fan by alternately pressing the two hook and carefully.
 STEP 9
Lock the processor fan by alternately pressing the two hook and carefully. Do not until you press too hard on the upper side of the fan. Then plug the power cable for the fan to the motherboard. Location of the socket is usually located next to the processor socket, looking for just that reads the CPU FAN.
 STEP 10
Next plug the memory card (RAM) on the DIMM slots that have been provided. Customize the type of RAM with the motherboard you use. At this practice we use the Asus P4B mobo that supports only type of SDRAM memory. Want to know your motherboard supports what type of memory? Look at the shape memory slot on the motherboard. When a slot has two limiting antarpin, means the type of RAM you should use the SD-RAM. Conversely, if there is only one barrier pins, then use the type of DDR-RAM. To install it, open the first hook Lock the memory card, then plug the card properly. Make sure the entire foot stuck the card in the slot. Then enter a key position with a hook on the lever penguncinya into the hole on the memory card.
 STEP 11
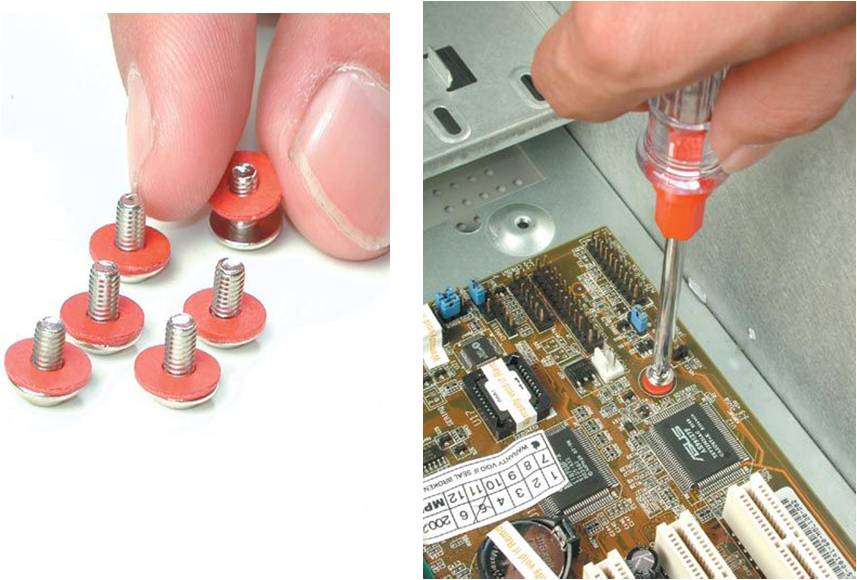
Switch to the casing, put the screws to the motherboard on the base plate. Colors are usually golden and hollow bolt. These bolts are usually supplied at the time you buy a PC casing. If not, then you can buy at the store nearest computer accessories. Make sure the placement in accordance with the number and position of the bolt holes that held the motherboard. Then tighten the bolts using pliers.

STEP 12
Prepare also the back cover plate, as a place of emergence of port PS / 2, USB, COM, Parallel and soundcards. This plate is also included when you buy the PC casing. Put on the back side of the casing, the position under the power supply. After that, install the bolt
 STEP 13
Lift the motherboard and place it into the casing. Position the motherboard with the bolt holes fit over the base bolts. Then put the bolts mobo which has been given a ring insulator. Use insulating ring just to avoid short-circuiting between pathways motherboard with screws. However, the existing motherboard designs currently prevent electronic route around the bolt holes. Once installed everything, fasten one by one by using a screwdriver

 STEP 4
Then Put swicthing power supply unit (PSU) adapter in the space provided. In the middle of tower and tower models, usually place at the top. Then glue it with four bolts. You can skip this step if you purchased the casing have included PSU in it.
 LOADING CPU AND MOTHERBOARD
STEP 5
Open up the box your motherboard, remove and place the motherboard on the table. But earlier, give the mats at the bottom of the motherboard with a cork which is available in the crib. Find the processor chip on the motherboard socket. The socket has a hole in accordance with the number of pins on the chip. In one corner there are two holes that are closed.
 STEP 6
Remove the processor by way of a hook lever pressing and then pull it upwards. Position hooks should be completely perpendicular, so that the socket holes completely open. Take processor, hold it firmly on the side-fractions. Then position it on the processor socket, make sure the corner is marked with a triangle near the hook. Plug in the processor chip in the socket and make sure the pin stuck into it. Be careful, do not be bent or broken pins.
 STEP 7
After the chip entered correctly into the socket, lower the hook by way of pushing back down. Hook up completely locked so that the processor chip can not be separated. Chip is not locked can also cause errors when the computer starts
 STEP 8
Should give the heatsink and fan on the processor chip to heat the processor is not fast and durable. Apply a little thermal paste or pasta cooler on it, then attach the heatsink and fan on top. Lock the processor fan by alternately pressing the two hook and carefully.
 STEP 9
Lock the processor fan by alternately pressing the two hook and carefully. Do not until you press too hard on the upper side of the fan. Then plug the power cable for the fan to the motherboard. Location of the socket is usually located next to the processor socket, looking for just that reads the CPU FAN.
 STEP 10
Next plug the memory card (RAM) on the DIMM slots that have been provided. Customize the type of RAM with the motherboard you use. At this practice we use the Asus P4B mobo that supports only type of SDRAM memory. Want to know your motherboard supports what type of memory? Look at the shape memory slot on the motherboard. When a slot has two limiting antarpin, means the type of RAM you should use the SD-RAM. Conversely, if there is only one barrier pins, then use the type of DDR-RAM. To install it, open the first hook Lock the memory card, then plug the card properly. Make sure the entire foot stuck the card in the slot. Then enter a key position with a hook on the lever penguncinya into the hole on the memory card.
 STEP 11
Switch to the casing, put the screws to the motherboard on the base plate. Colors are usually golden and hollow bolt. These bolts are usually supplied at the time you buy a PC casing. If not, then you can buy at the store nearest computer accessories. Make sure the placement in accordance with the number and position of the bolt holes that held the motherboard. Then tighten the bolts using pliers.

STEP 12
Prepare also the back cover plate, as a place of emergence of port PS / 2, USB, COM, Parallel and soundcards. This plate is also included when you buy the PC casing. Put on the back side of the casing, the position under the power supply. After that, install the bolt
 STEP 13
Lift the motherboard and place it into the casing. Position the motherboard with the bolt holes fit over the base bolts. Then put the bolts mobo which has been given a ring insulator. Use insulating ring just to avoid short-circuiting between pathways motherboard with screws. However, the existing motherboard designs currently prevent electronic route around the bolt holes. Once installed everything, fasten one by one by using a screwdriver

0 Comments:
Post a Comment